Article
How to File a Good Bug Report: Record, Narrate, and Export with Easy Scribe
Filing a good bug report is one of the most underrated skills in software development. A vague ticket that says "dashboard broken" forces the developer to play detective, burning hours on back-and-forth before the real work even starts. A great report, on the other hand, hands them everything they need: numbered reproduction steps, expected vs. actual behavior, and visual proof at each stage.
This tutorial shows you how to create that kind of report quickly using Easy Scribe, turning a narrated screen recording into a captioned, screenshot-rich bug repro you can paste straight into Jira, Linear, GitHub Issues, or any other tracker.
What Makes a Good Bug Report?
Before we get into the workflow, it helps to understand what developers actually need from a bug report. Industry best practices consistently call out the same core elements:
Clear, descriptive title that summarizes the symptom and context.
Numbered steps to reproduce starting from a known state, listing exact UI elements and actions.
Expected result vs. actual result so the developer can confirm the defect and verify their fix.
Visual evidence such as screenshots or video showing the bug in action.
Environment details like browser, OS, and app version.
As QA Wolf notes, "precise steps eliminate ambiguity and prevent back-and-forth clarification during debugging." And BrowserStack's guide highlights that a bug report should include steps to reproduce, expected and actual outcomes, visual proof, and severity.
The problem is not that people lack this knowledge. The problem is that assembling all of it manually, especially screenshots with captions at each step, takes a long time.
The Manual Way (and Why It's Slow)
Picture the typical flow: a developer fixes a bug and marks it resolved. You need to verify the fix, which means you first need a clear repro that shows the exact steps, UI state at each step, expected behavior, and what actually happens.
The manual approach looks something like this:
Click through the bug flow, taking a screenshot at each step.
Paste each screenshot into a document or ticket.
Write a caption under every image describing what you did and what happened.
Add "Expected" and "Actual" labels.
Format the whole thing so it is readable.
For a bug with six or seven steps, this easily takes 20 to 45 minutes. Multiply that across several bugs in a sprint and it becomes a serious time drain. A Rollbar-commissioned survey found that more than a third of developers spend up to a quarter of their time fixing bugs instead of writing new code, and incomplete reports only make that worse.
The Easy Scribe Way: Record, Narrate, Export
Easy Scribe turns a screen recording into accurate, step-by-step documentation with contextual screenshots. Here is how to use that capability specifically for bug repros.
Step 1: Start a Screen Recording
Open Easy Scribe and sign in.
In your Library, click + New Document and select Instant recording.
Toggle Mic on so Easy Scribe captures your narration.
Review the Start delay (default 5 seconds) and adjust if needed.
Click Start recording, grant your browser permission to share your screen (and microphone when prompted), and wait for the countdown.
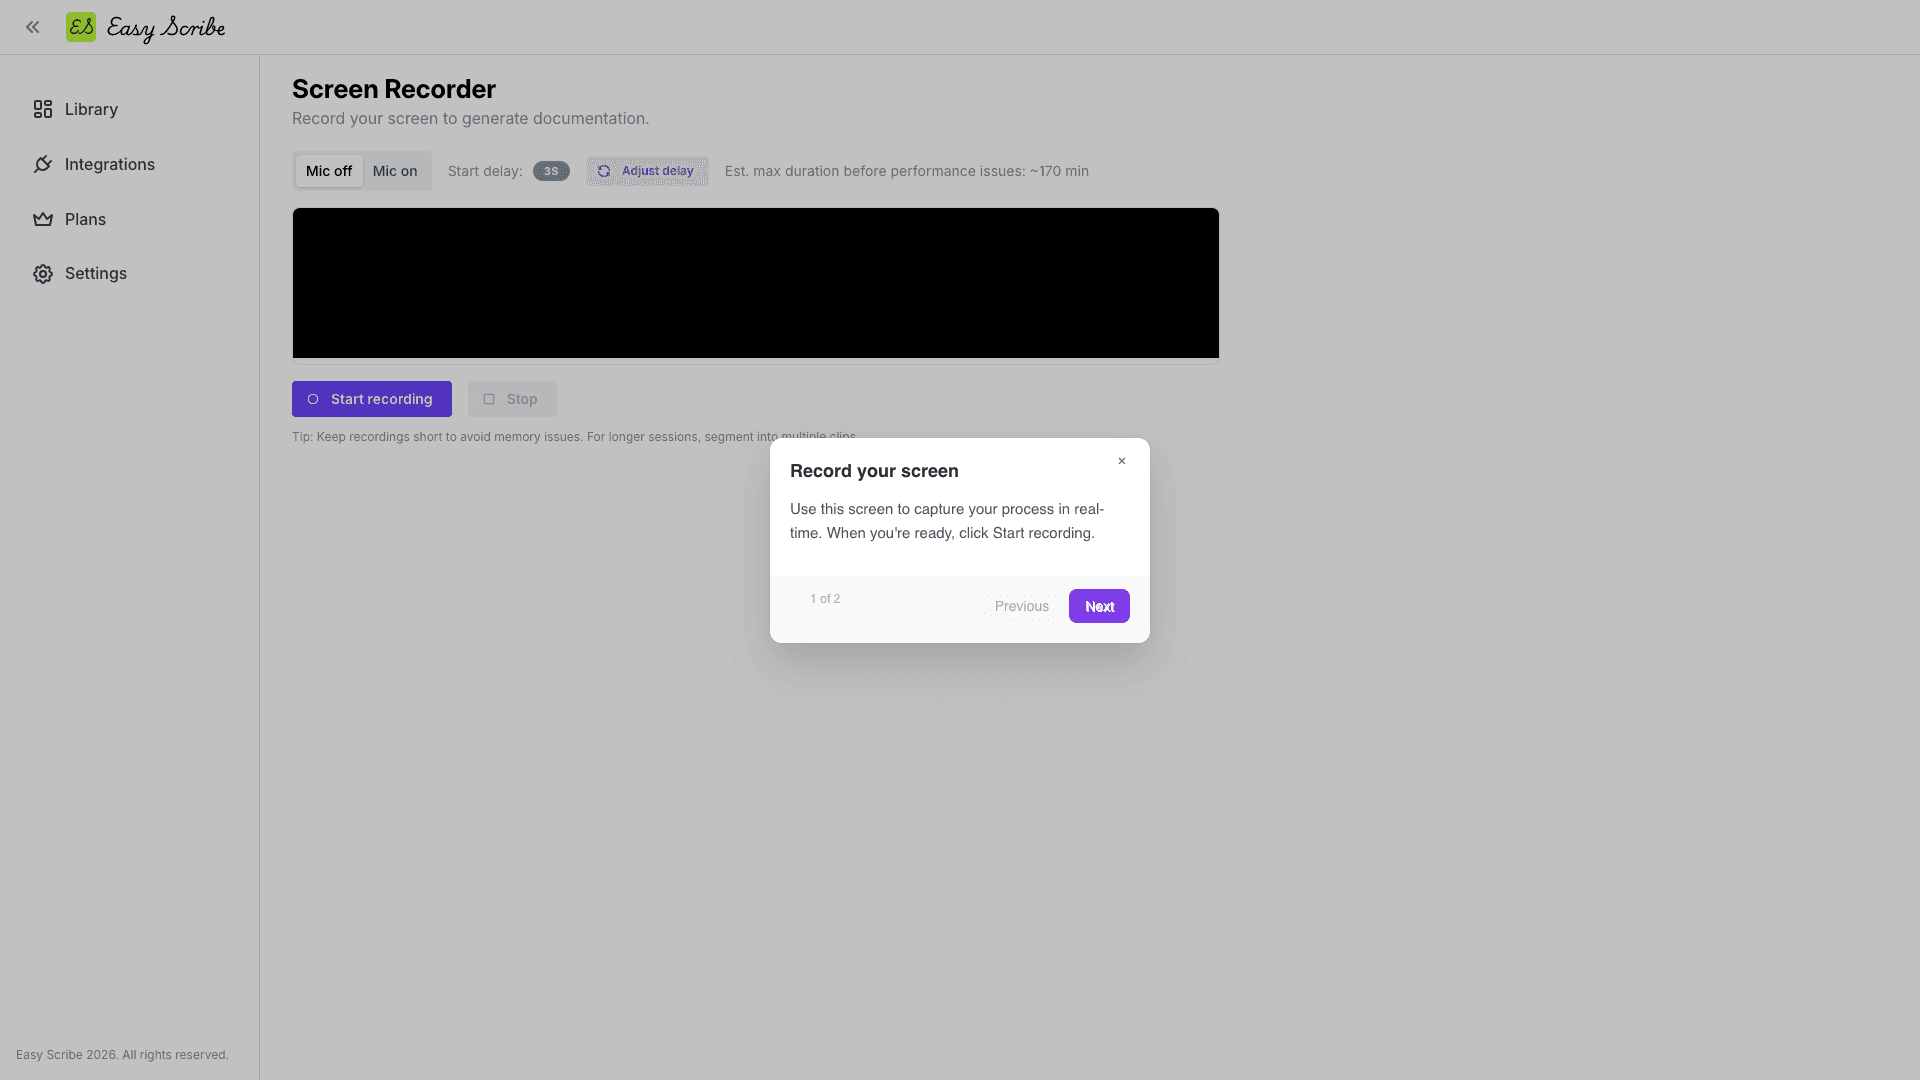
No browser extension or desktop install is required. Easy Scribe is browser-based and works in locked-down IT environments.
Step 2: Walk Through the Bug and Narrate
Perform the exact steps that trigger the bug. As you click, narrate what you are doing and what you expect:
"I am clicking the Dashboard link in the sidebar. Expected: the analytics dashboard loads. Actual: nothing happens, the page stays blank."
"Now I am refreshing the page. Expected: dashboard loads on refresh. Actual: still blank."
Speak naturally. Easy Scribe uses your audio transcription to generate the written instructions, so the more specific your narration, the clearer the output.
When you have finished reproducing the bug, click Stop to end the recording.
Step 3: Trim and Set Screenshot Points
On the Edit Recording screen, use the timeline to set In/Out points and remove any dead time at the start or end. If a key moment was not captured automatically, move the playhead to that frame and click Add Screenshot Point to insert a manual capture. These manual screenshot points are included in addition to the auto-captured ones.
Click Export when you are satisfied.
Step 4: Generate the Bug Repro Document
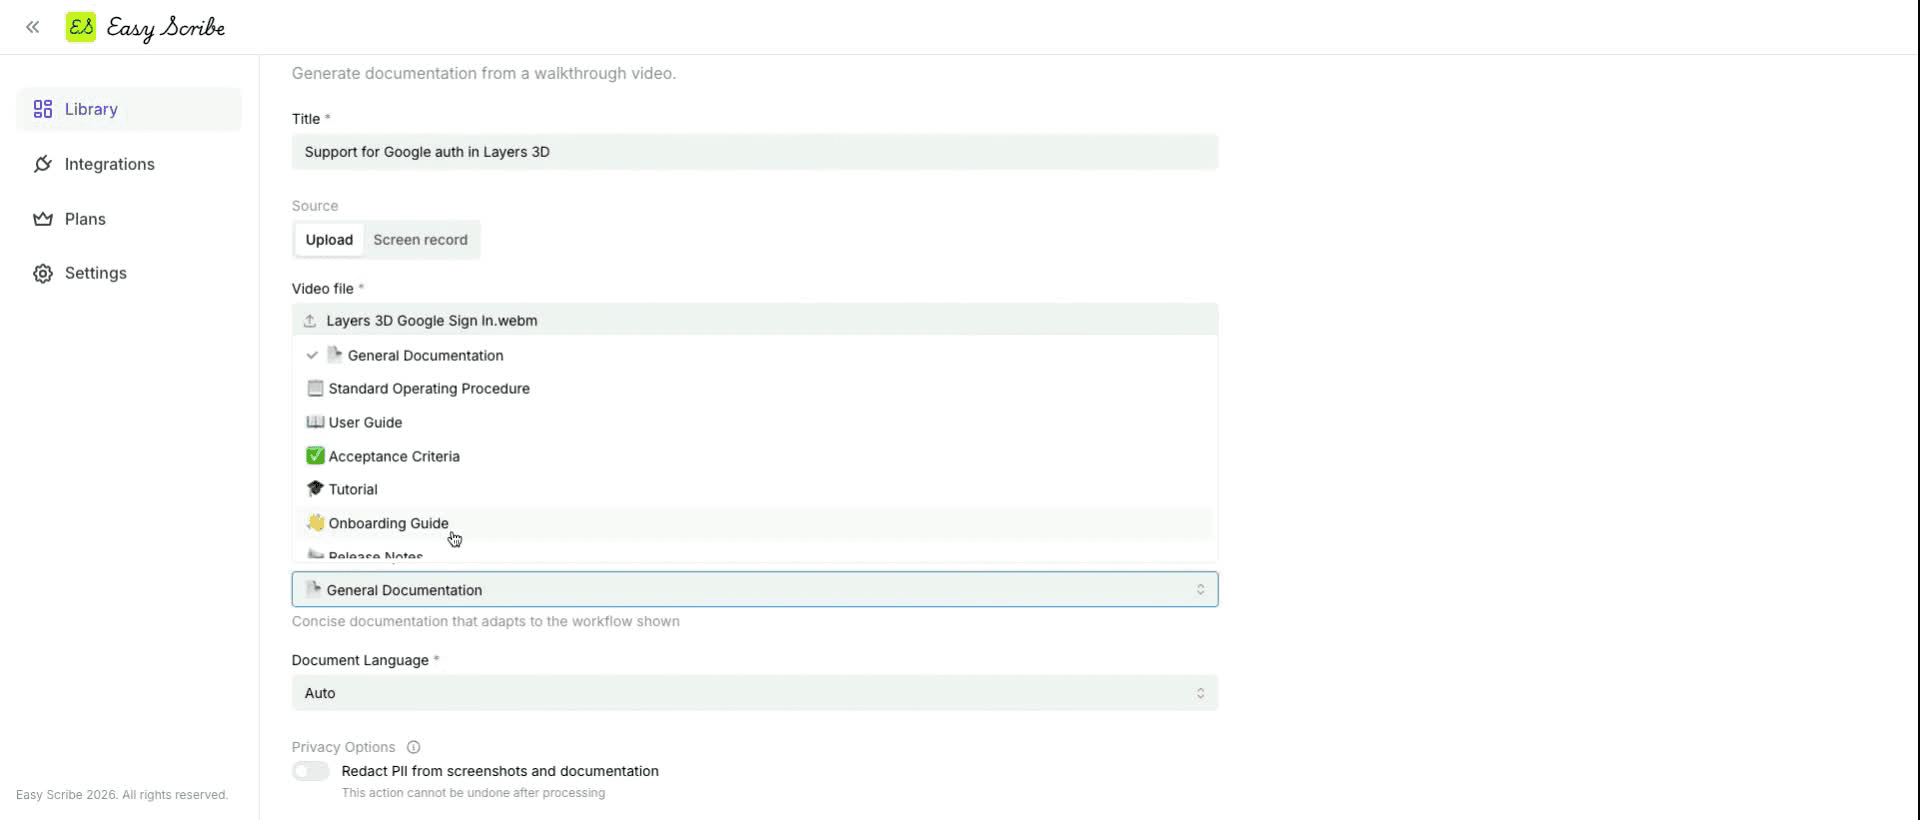
Back on the New Document form, enter a Title (e.g., "BUG: Dashboard fails to load after login").
Open the Document Template dropdown and select Troubleshooting Guide. This template is designed for issue diagnosis and resolution, making it ideal for bug repros.
Set Document Language to Auto (or pick a specific language).
Optionally add Description/Instructions to guide generation, for example: "Focus on expected vs. actual behavior at each step. Audience: backend developers."
Click Create.
Easy Scribe transcribes your narration, extracts screenshots at the relevant moments, and assembles a captioned, ordered guide.
Step 5: Review and Refine
The generated document opens in the rich text editor. You can:
Edit any step's text for clarity.
Drag and drop images to reorder them.
Apply formatting (headings H1 to H4, bold, italic, bulleted/numbered lists, links).
The editor autosaves your changes.
Step 6: Export to Your Bug Tracker
Click the Export button in the editor toolbar and choose your format:
Markdown for pasting into Jira, GitHub Issues, Linear, or any Markdown-friendly tracker.
PDF for attaching to a ticket or sending to a stakeholder.
Word (DOCX) for teams that prefer Word-based documentation.
HTML for embedding in a wiki or internal site.
Confluence (Pro plan) for publishing directly as a Confluence page.

You can also share the document by link with view, comment, or edit access, or embed it on another site.
Why This Workflow Works for Bug Repros
Narration becomes captions. Your spoken description feeds the generated instructions, so you never have to re-type steps manually.
Screenshots are automatic. Easy Scribe extracts contextual screenshots tied to each step, plus you can add manual screenshot points for critical frames.
Developers see exactly what you saw. A captioned visual walkthrough eliminates the dreaded "works on my machine" response.
No extension or install needed. The recorder runs in your browser, which matters in environments where IT restricts software installs.
PII redaction is available. On the Pro plan, Easy Scribe redacts Personally Identifiable Information across both text and screenshots, keeping sensitive data out of bug tickets.
Free tier is generous. The free plan includes the in-app recorder, AI-generated guides, auto-extracted screenshots, audio transcription, the rich text editor, and export to PDF, Markdown, and HTML with no upload size limits.
Tips for Better Bug Repros
One bug per recording. Keep each recording focused on a single defect. This makes trimming faster and the generated document cleaner.
Start from a known state. Begin your recording from a predictable point (e.g., the login page or a fresh browser tab) so developers can follow from scratch.
Speak your expected and actual results. Explicitly saying "Expected: X. Actual: Y" gives Easy Scribe the clearest input for generating useful captions.
Trim aggressively. Cut out pauses, tab-switching, and password entry before generating the document.
Add manual screenshot points at key transitions. Button clicks, error messages, and empty states are the frames developers need most.
Frequently Asked Questions
Do I need to install anything to use Easy Scribe for bug reporting?
No. Easy Scribe is browser-based and needs no install or browser extension. You can optionally install it as a PWA from the dashboard, but it is not required. This makes it especially useful in corporate environments where software installs are restricted.
Which document template should I use for bug reports?
Select the Troubleshooting Guide template. It is designed for issue diagnosis and resolution. Easy Scribe offers eight templates in total: General Documentation, Standard Operating Procedure, User Guide, Tutorial, Onboarding Guide, Release Notes, Troubleshooting Guide, and Acceptance Criteria.
Can I use Easy Scribe with Jira or GitHub Issues?
Yes. Export your bug repro document as Markdown and paste it directly into any Markdown-compatible tracker such as Jira, GitHub Issues, or Linear. For Confluence users on the Pro plan, you can also publish directly as a Confluence page.
Is Easy Scribe free for bug reporting?
Yes. The free tier includes unlimited documents, the in-app screen recorder, AI-generated step-by-step guides, auto-extracted screenshots, audio transcription, the rich text editor, and export to PDF, Markdown, and HTML. The free workspace supports up to 2 users. No credit card is required.
What if my bug recording contains sensitive data?
On the Pro plan ($9.99 per user per month), Easy Scribe offers PII redaction that removes Personally Identifiable Information from both text and screenshots. On any plan, you can also edit screenshots and text manually after generation to remove sensitive details before exporting.
Filing a good bug report is one of the most underrated skills in software development. A vague ticket that says "dashboard broken" forces the developer to play detective, burning hours on back-and-forth before the real work even starts. A great report, on the other hand, hands them everything they need: numbered reproduction steps, expected vs. actual behavior, and visual proof at each stage.
This tutorial shows you how to create that kind of report quickly using Easy Scribe, turning a narrated screen recording into a captioned, screenshot-rich bug repro you can paste straight into Jira, Linear, GitHub Issues, or any other tracker.
What Makes a Good Bug Report?
Before we get into the workflow, it helps to understand what developers actually need from a bug report. Industry best practices consistently call out the same core elements:
Clear, descriptive title that summarizes the symptom and context.
Numbered steps to reproduce starting from a known state, listing exact UI elements and actions.
Expected result vs. actual result so the developer can confirm the defect and verify their fix.
Visual evidence such as screenshots or video showing the bug in action.
Environment details like browser, OS, and app version.
As QA Wolf notes, "precise steps eliminate ambiguity and prevent back-and-forth clarification during debugging." And BrowserStack's guide highlights that a bug report should include steps to reproduce, expected and actual outcomes, visual proof, and severity.
The problem is not that people lack this knowledge. The problem is that assembling all of it manually, especially screenshots with captions at each step, takes a long time.
The Manual Way (and Why It's Slow)
Picture the typical flow: a developer fixes a bug and marks it resolved. You need to verify the fix, which means you first need a clear repro that shows the exact steps, UI state at each step, expected behavior, and what actually happens.
The manual approach looks something like this:
Click through the bug flow, taking a screenshot at each step.
Paste each screenshot into a document or ticket.
Write a caption under every image describing what you did and what happened.
Add "Expected" and "Actual" labels.
Format the whole thing so it is readable.
For a bug with six or seven steps, this easily takes 20 to 45 minutes. Multiply that across several bugs in a sprint and it becomes a serious time drain. A Rollbar-commissioned survey found that more than a third of developers spend up to a quarter of their time fixing bugs instead of writing new code, and incomplete reports only make that worse.
The Easy Scribe Way: Record, Narrate, Export
Easy Scribe turns a screen recording into accurate, step-by-step documentation with contextual screenshots. Here is how to use that capability specifically for bug repros.
Step 1: Start a Screen Recording
Open Easy Scribe and sign in.
In your Library, click + New Document and select Instant recording.
Toggle Mic on so Easy Scribe captures your narration.
Review the Start delay (default 5 seconds) and adjust if needed.
Click Start recording, grant your browser permission to share your screen (and microphone when prompted), and wait for the countdown.
No browser extension or desktop install is required. Easy Scribe is browser-based and works in locked-down IT environments.
Step 2: Walk Through the Bug and Narrate
Perform the exact steps that trigger the bug. As you click, narrate what you are doing and what you expect:
"I am clicking the Dashboard link in the sidebar. Expected: the analytics dashboard loads. Actual: nothing happens, the page stays blank."
"Now I am refreshing the page. Expected: dashboard loads on refresh. Actual: still blank."
Speak naturally. Easy Scribe uses your audio transcription to generate the written instructions, so the more specific your narration, the clearer the output.
When you have finished reproducing the bug, click Stop to end the recording.
Step 3: Trim and Set Screenshot Points
On the Edit Recording screen, use the timeline to set In/Out points and remove any dead time at the start or end. If a key moment was not captured automatically, move the playhead to that frame and click Add Screenshot Point to insert a manual capture. These manual screenshot points are included in addition to the auto-captured ones.
Click Export when you are satisfied.
Step 4: Generate the Bug Repro Document
Back on the New Document form, enter a Title (e.g., "BUG: Dashboard fails to load after login").
Open the Document Template dropdown and select Troubleshooting Guide. This template is designed for issue diagnosis and resolution, making it ideal for bug repros.
Set Document Language to Auto (or pick a specific language).
Optionally add Description/Instructions to guide generation, for example: "Focus on expected vs. actual behavior at each step. Audience: backend developers."
Click Create.
Easy Scribe transcribes your narration, extracts screenshots at the relevant moments, and assembles a captioned, ordered guide.
Step 5: Review and Refine
The generated document opens in the rich text editor. You can:
Edit any step's text for clarity.
Drag and drop images to reorder them.
Apply formatting (headings H1 to H4, bold, italic, bulleted/numbered lists, links).
The editor autosaves your changes.
Step 6: Export to Your Bug Tracker
Click the Export button in the editor toolbar and choose your format:
Markdown for pasting into Jira, GitHub Issues, Linear, or any Markdown-friendly tracker.
PDF for attaching to a ticket or sending to a stakeholder.
Word (DOCX) for teams that prefer Word-based documentation.
HTML for embedding in a wiki or internal site.
Confluence (Pro plan) for publishing directly as a Confluence page.
You can also share the document by link with view, comment, or edit access, or embed it on another site.
Why This Workflow Works for Bug Repros
Narration becomes captions. Your spoken description feeds the generated instructions, so you never have to re-type steps manually.
Screenshots are automatic. Easy Scribe extracts contextual screenshots tied to each step, plus you can add manual screenshot points for critical frames.
Developers see exactly what you saw. A captioned visual walkthrough eliminates the dreaded "works on my machine" response.
No extension or install needed. The recorder runs in your browser, which matters in environments where IT restricts software installs.
PII redaction is available. On the Pro plan, Easy Scribe redacts Personally Identifiable Information across both text and screenshots, keeping sensitive data out of bug tickets.
Free tier is generous. The free plan includes the in-app recorder, AI-generated guides, auto-extracted screenshots, audio transcription, the rich text editor, and export to PDF, Markdown, and HTML with no upload size limits.
Tips for Better Bug Repros
One bug per recording. Keep each recording focused on a single defect. This makes trimming faster and the generated document cleaner.
Start from a known state. Begin your recording from a predictable point (e.g., the login page or a fresh browser tab) so developers can follow from scratch.
Speak your expected and actual results. Explicitly saying "Expected: X. Actual: Y" gives Easy Scribe the clearest input for generating useful captions.
Trim aggressively. Cut out pauses, tab-switching, and password entry before generating the document.
Add manual screenshot points at key transitions. Button clicks, error messages, and empty states are the frames developers need most.
Frequently Asked Questions
Do I need to install anything to use Easy Scribe for bug reporting?
No. Easy Scribe is browser-based and needs no install or browser extension. You can optionally install it as a PWA from the dashboard, but it is not required. This makes it especially useful in corporate environments where software installs are restricted.
Which document template should I use for bug reports?
Select the Troubleshooting Guide template. It is designed for issue diagnosis and resolution. Easy Scribe offers eight templates in total: General Documentation, Standard Operating Procedure, User Guide, Tutorial, Onboarding Guide, Release Notes, Troubleshooting Guide, and Acceptance Criteria.
Can I use Easy Scribe with Jira or GitHub Issues?
Yes. Export your bug repro document as Markdown and paste it directly into any Markdown-compatible tracker such as Jira, GitHub Issues, or Linear. For Confluence users on the Pro plan, you can also publish directly as a Confluence page.
Is Easy Scribe free for bug reporting?
Yes. The free tier includes unlimited documents, the in-app screen recorder, AI-generated step-by-step guides, auto-extracted screenshots, audio transcription, the rich text editor, and export to PDF, Markdown, and HTML. The free workspace supports up to 2 users. No credit card is required.
What if my bug recording contains sensitive data?
On the Pro plan ($9.99 per user per month), Easy Scribe offers PII redaction that removes Personally Identifiable Information from both text and screenshots. On any plan, you can also edit screenshots and text manually after generation to remove sensitive details before exporting.

Easy Scribe
Rich documentation, walkthroughs, and guides from screen recordings.
Quick links
RESOURCES
© 2025 Easy Scribe. All Rights Reserved