Release Log
New: Interactive Walkthrough and Sharing Features in Easy Scribe
We are excited to announce a major set of features in Easy Scribe: interactive walkthroughs and sharing options. Together, these capabilities let you turn your step-by-step documentation into clickable, guided tour experiences and distribute them to anyone through public links, private invites, or HTML embeds.
Whether you are onboarding new users, training teammates, or publishing customer-facing guides, these features give you a complete author-to-audience workflow without leaving Easy Scribe.
Why Interactive Walkthroughs Matter
Static documentation is helpful, but guided, visual experiences drive deeper understanding. Industry research shows that products with interactive onboarding see 50% higher activation rates than those relying on passive tours, and walkthroughs can reduce support ticket volume by 20-30% by delivering contextual, on-screen guidance.
Easy Scribe's interactive walkthroughs bring this same principle to your documentation. From a single screen recording, you already get an AI-generated step-by-step document. Now you can convert that same document into a player-based, clickable tour your audience can follow at their own pace.
What Is an Interactive Walkthrough in Easy Scribe?
An interactive walkthrough is a player-based tour generated from an existing Easy Scribe document. Each step in the walkthrough can be one of three types:
Spotlight hotspot tour over a screenshot (click, focus, or tooltip hotspots)
Screenshot with a caption
Text slide

The walkthrough is fully editable after generation, and it stays connected to its source document so you can sync changes as content evolves.
How to Create and Edit an Interactive Walkthrough
Step 1: Generate the walkthrough
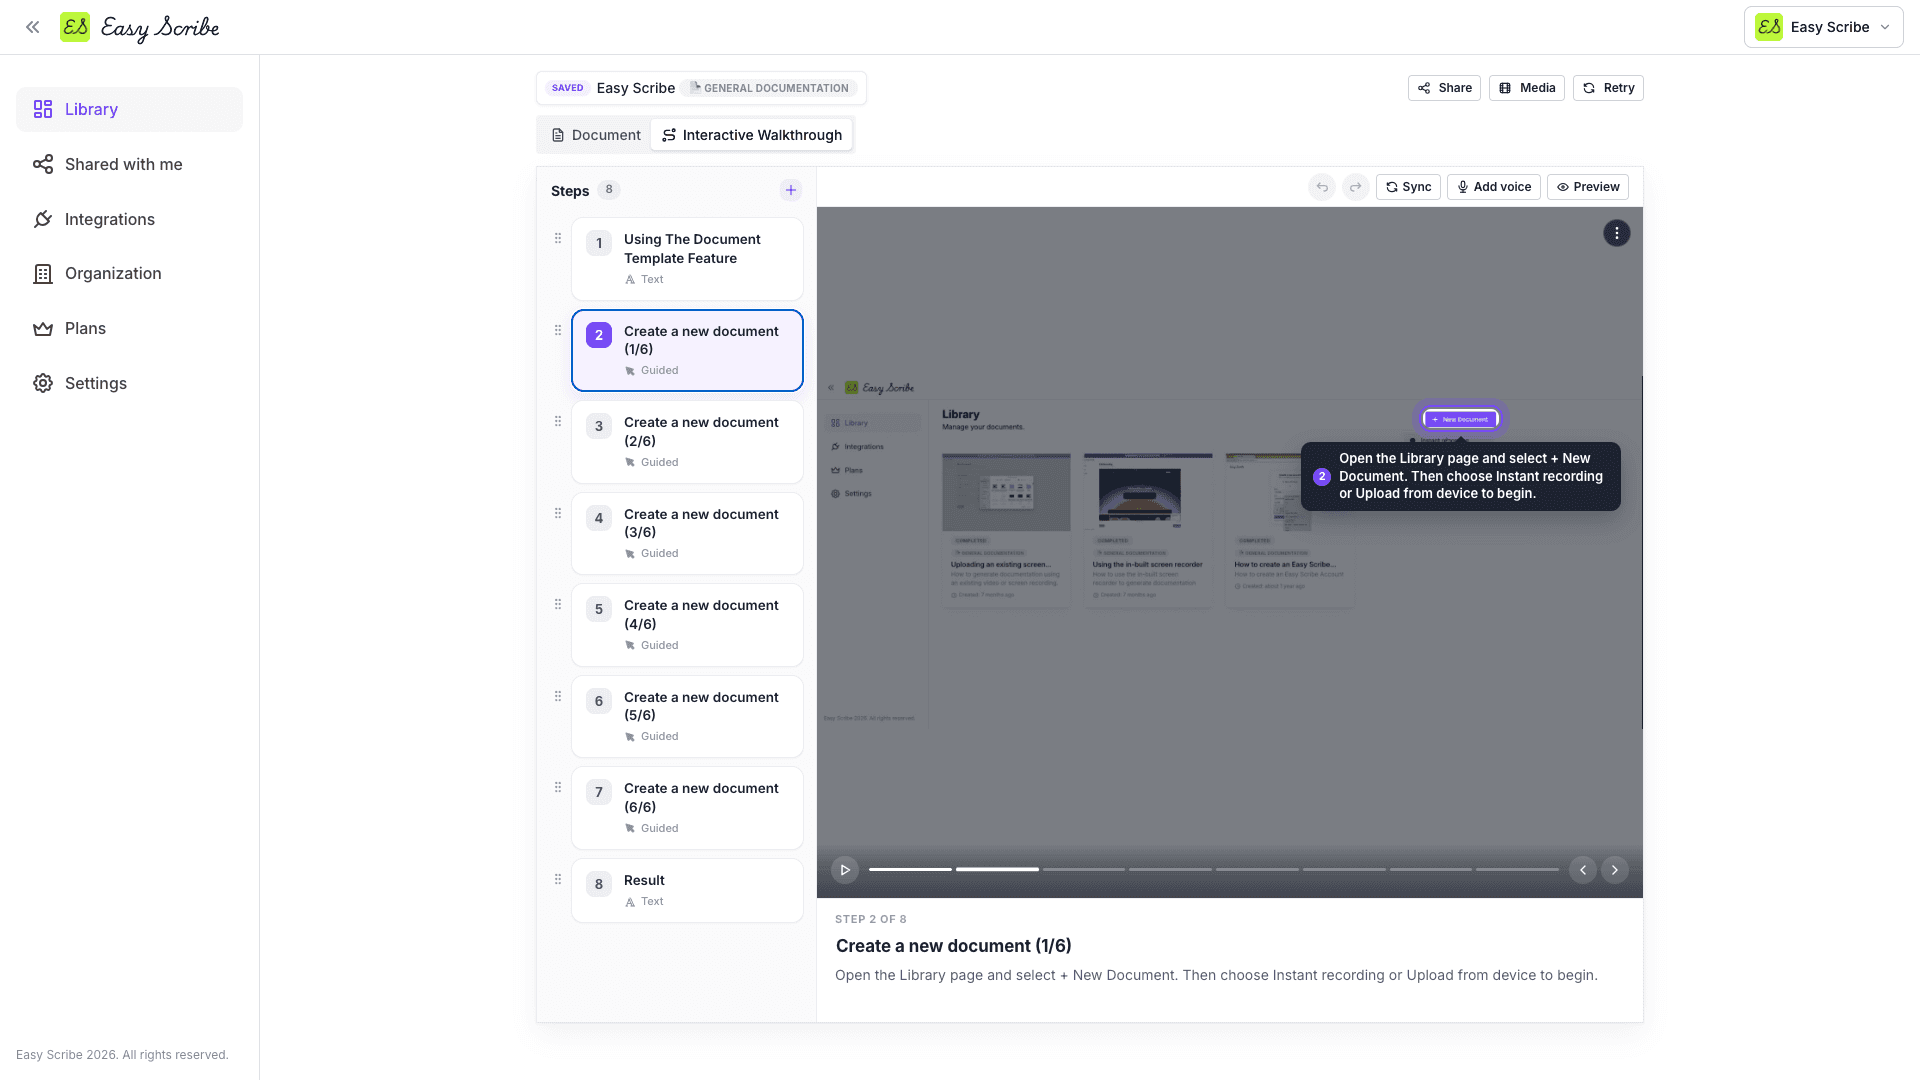
Open a completed document in the Easy Scribe editor, then select the Interactive Walkthrough tab. Easy Scribe generates the walkthrough from the document's existing steps. Review the title, subtitle, and step list to confirm the flow matches your intent.
For full details, see the Creating an Interactive Walkthrough guide.
Step 2: Edit individual steps
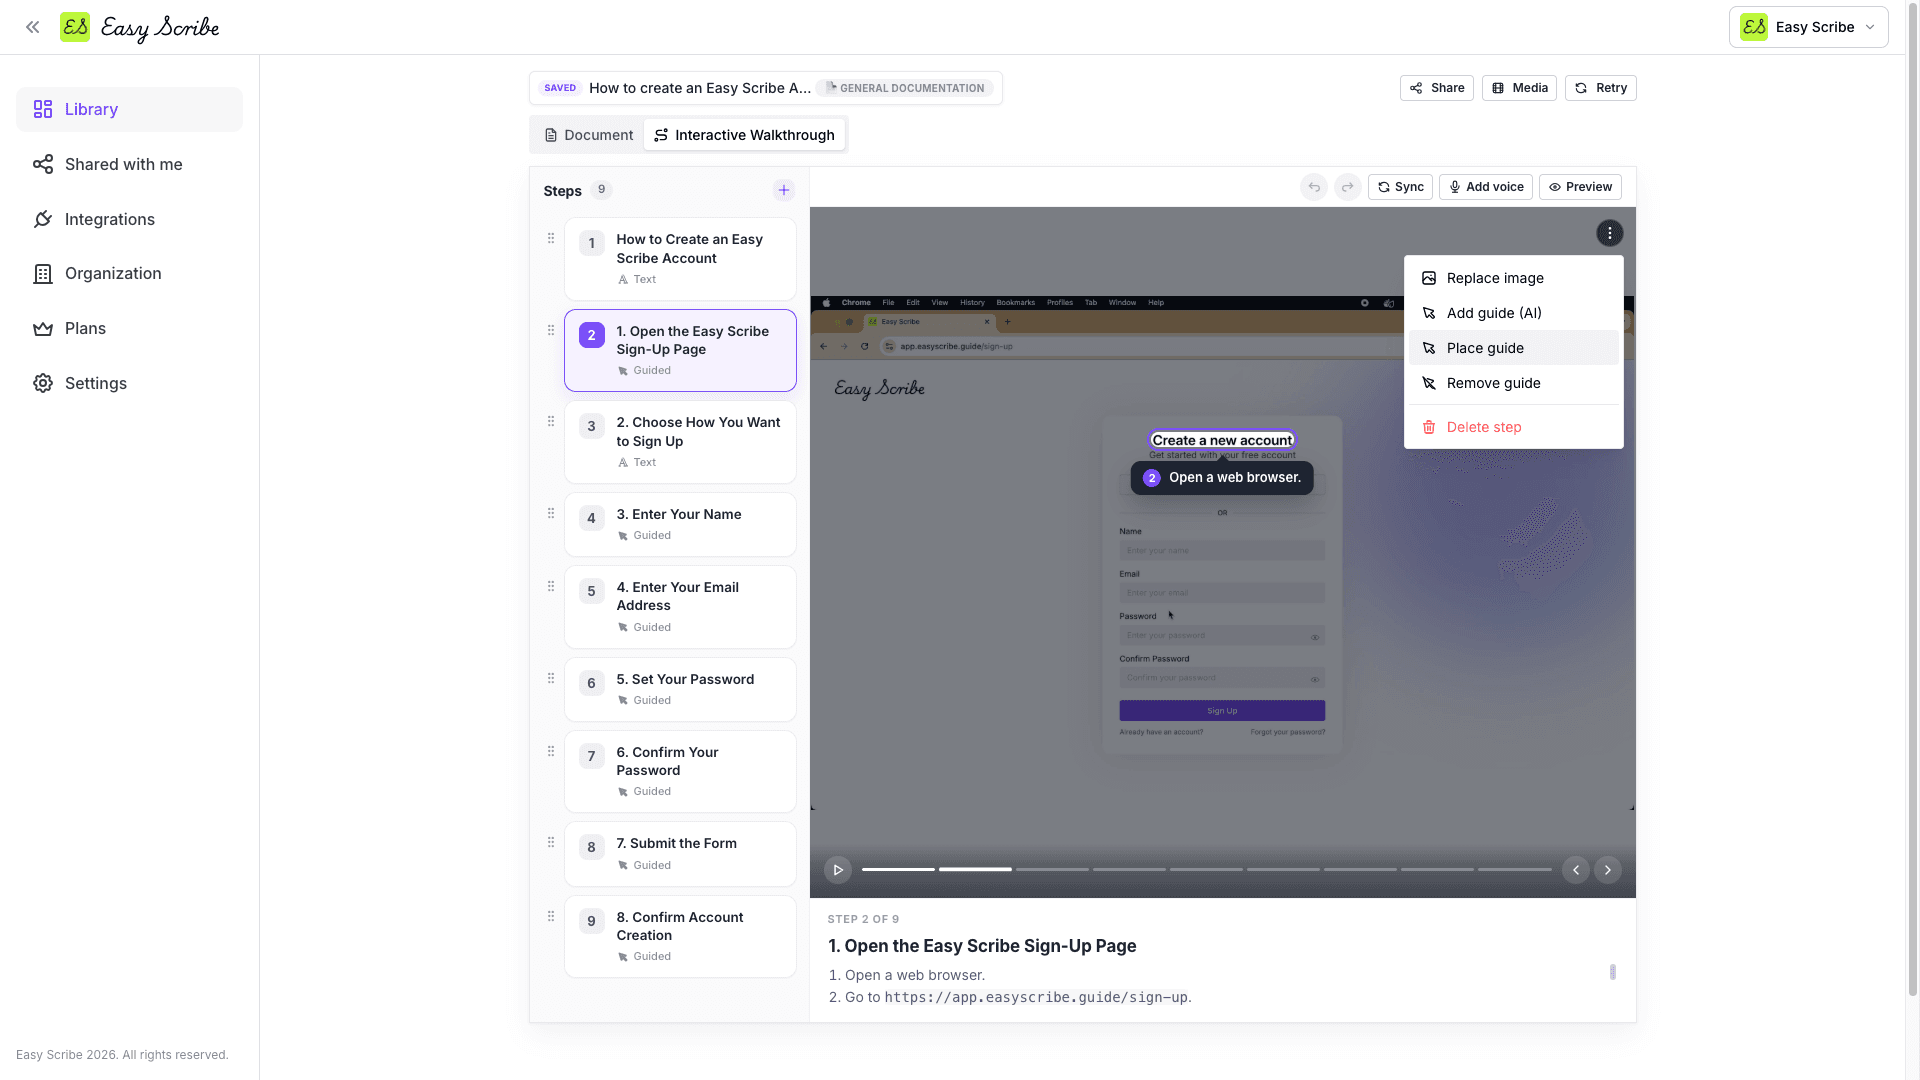
Select any step in the steps list to open it in the editor. From there you can:
Reposition the guide - Open the Step actions menu, select Place guide, and click where the highlight should point in the preview.
Sync from the source document - Hover over Sync to pull the latest content from the document into the walkthrough.
Add AI voice narration (Pro) - Hover over Add voice to generate narration for the step.
Preview - Open preview mode to review the updated step before sharing.
See the Editing a Walkthrough Step docs for a detailed walkthrough.
Step 3: Add, remove, and sort steps
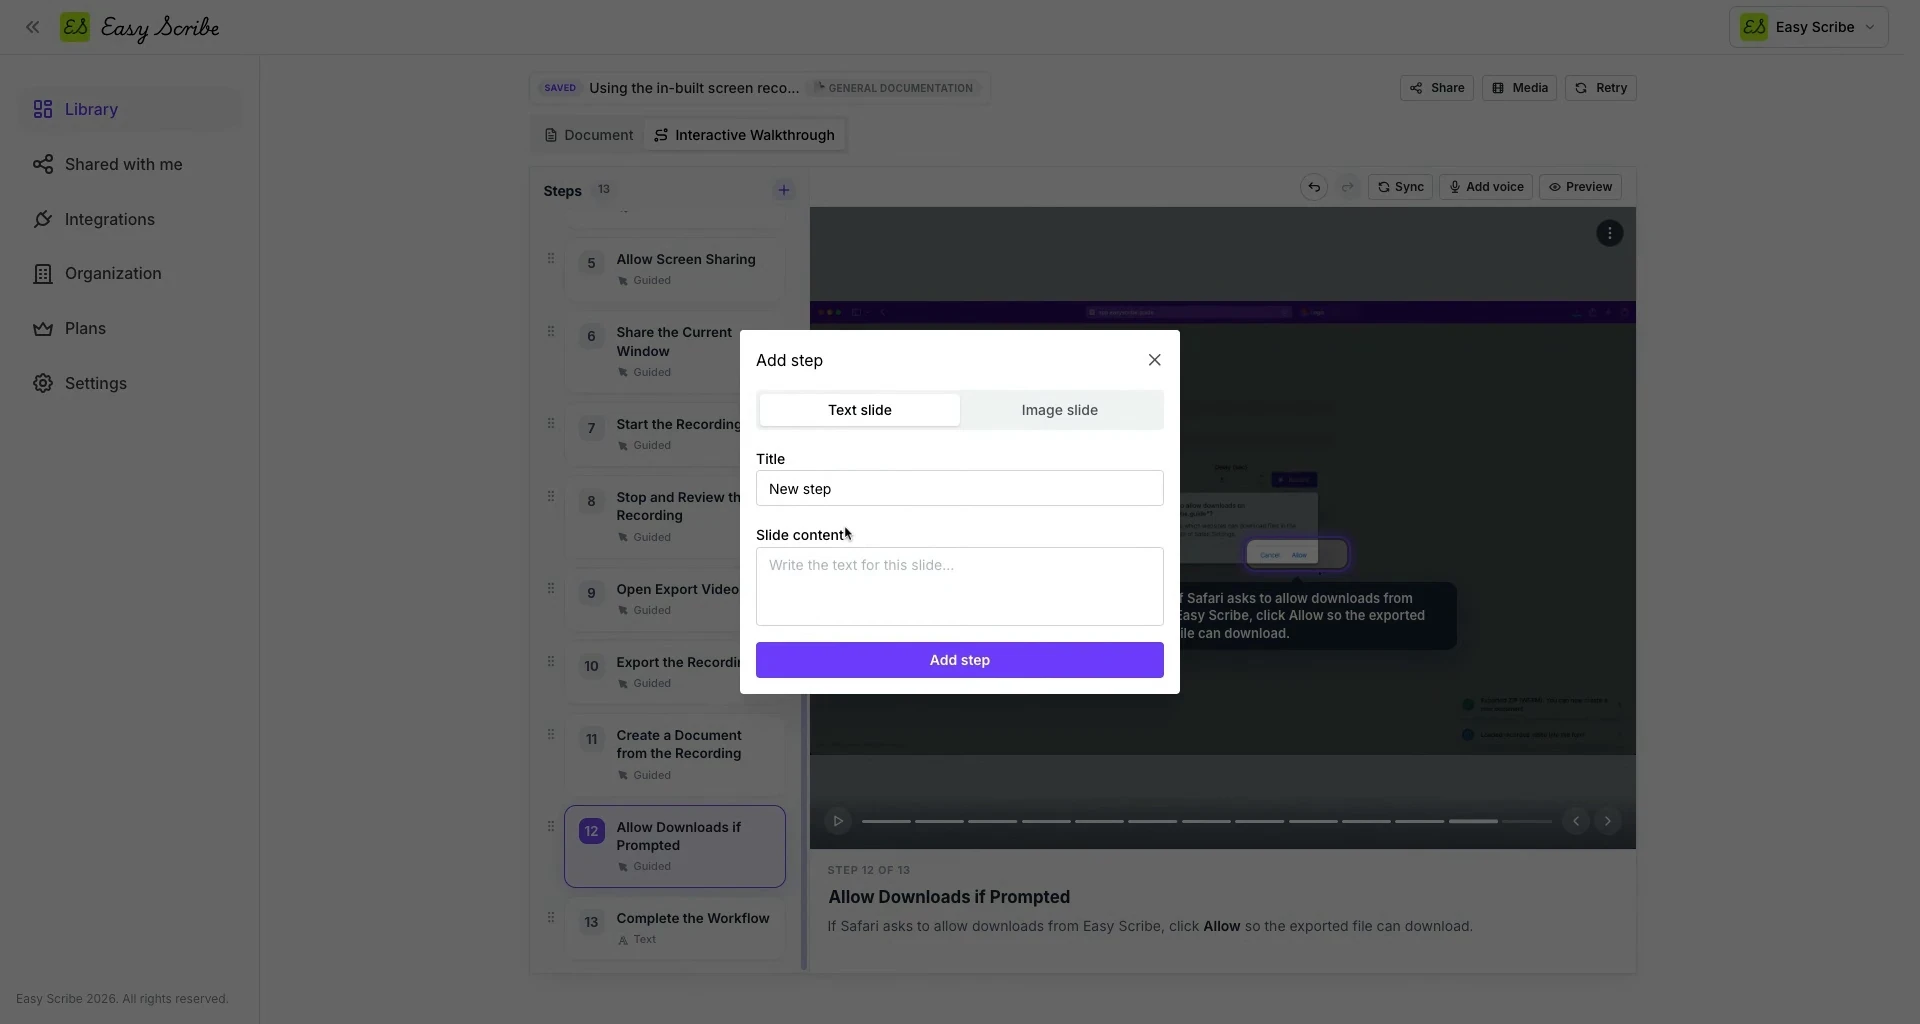
You are not limited to the auto-generated steps. Use the Add step dialog to insert new content:
Text slide - Enter a title and slide content.
Image slide - Enter a title, caption, and choose an image source (such as a document screenshot).
After adding a step, drag it to the correct position in the steps list and confirm its placement. For the full procedure, see Adding and Sorting Walkthrough Steps.
Sharing Options: Get Your Work in Front of the Right People
Once your document or walkthrough is ready, Easy Scribe gives you multiple ways to share it. The sharing controls are accessed by selecting Share from the top-right toolbar of any document or walkthrough.
Share a document
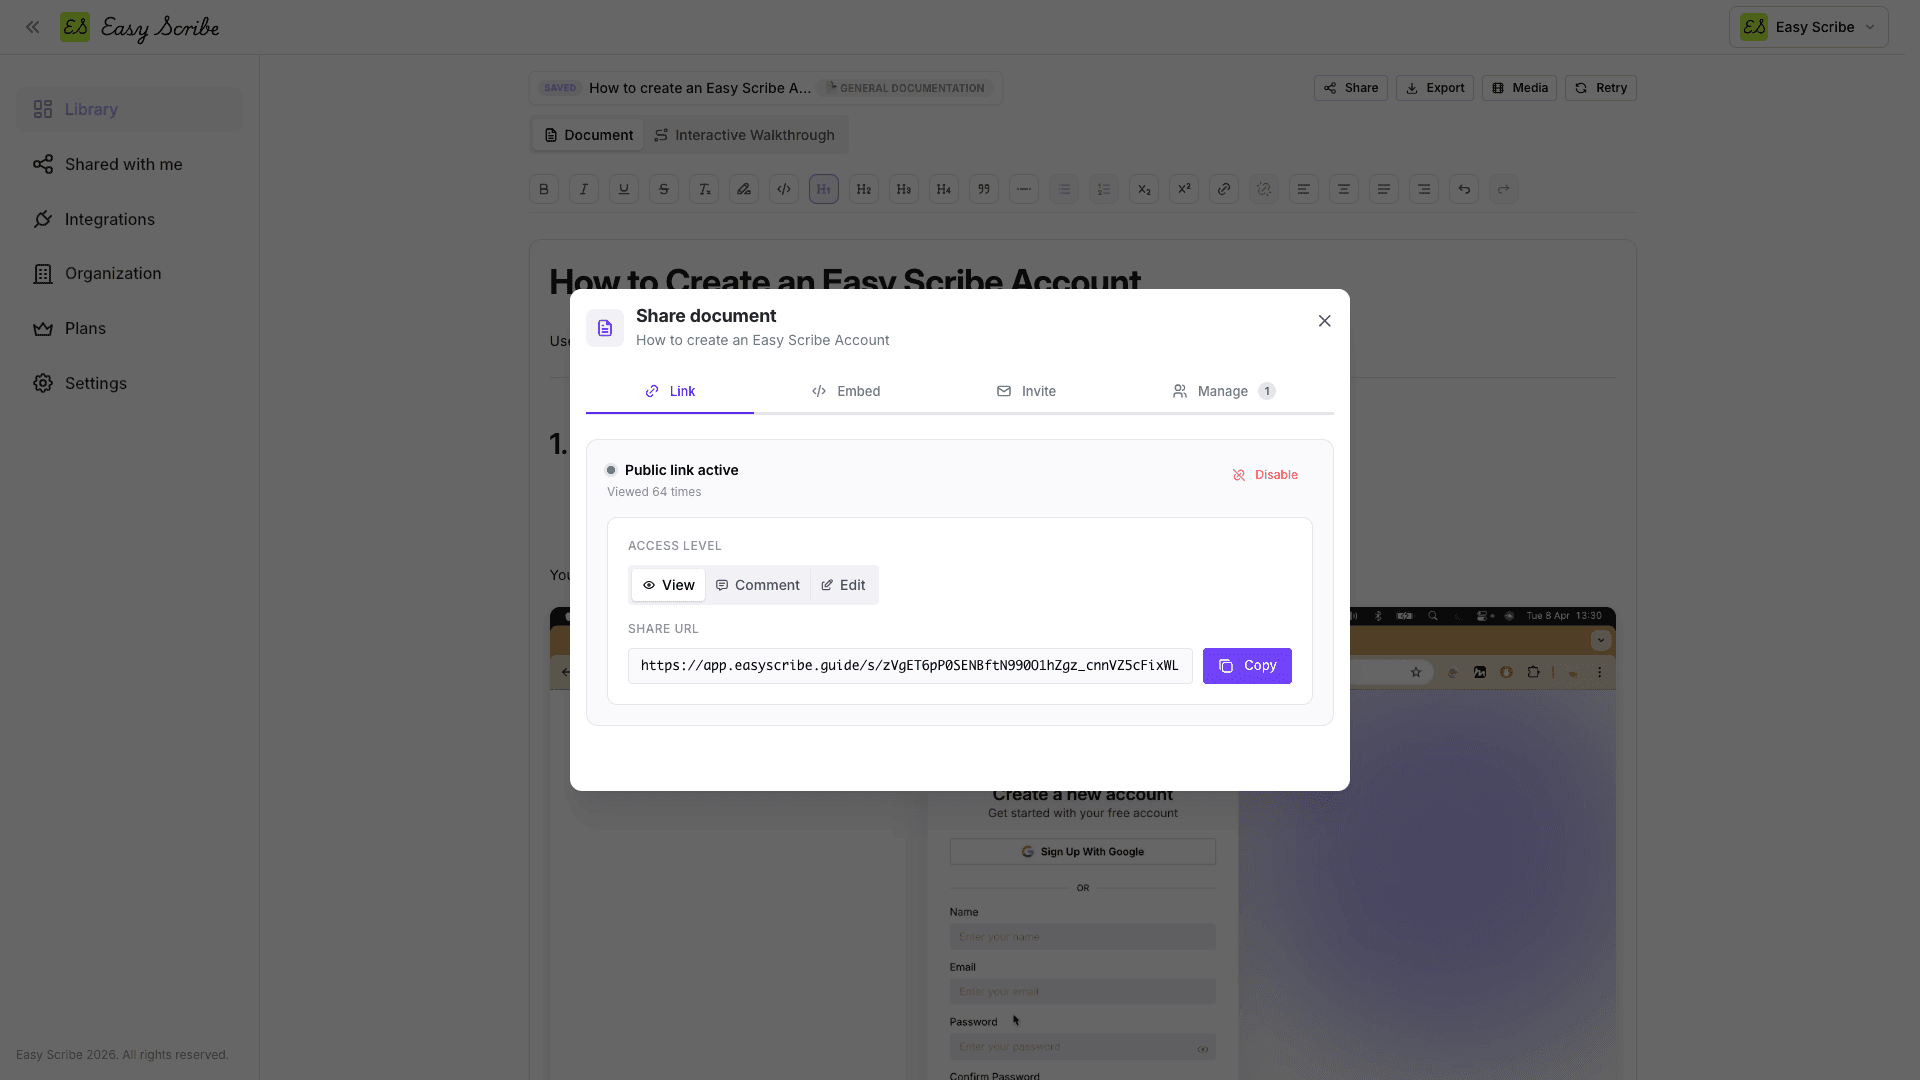
The Share document dialog offers four tabs:
Link - Copy a public document link. Choose the access level: View, Comment, or Edit.
Embed - Preview the embedded document, set dimensions, and copy the HTML embed code to paste into any HTML-supported destination.
Invite - Add specific people, assign an access level (View, Comment, or Edit), and send the invitation directly.
Manage - View existing shares, change access levels (View only, Can comment, Can edit), Revoke access, or Delete permanently.

Share an interactive walkthrough
Walkthrough sharing is streamlined for distribution:
Link - Copy a public, view-only walkthrough URL. Anyone with the link can view the walkthrough.
Embed - Set the width and height, then copy the embed code to display the walkthrough on an external page.

Walkthrough links are view-only. If you need comment or edit access for collaborators, use document sharing instead.
For full details on all sharing flows, see the Sharing Options documentation.
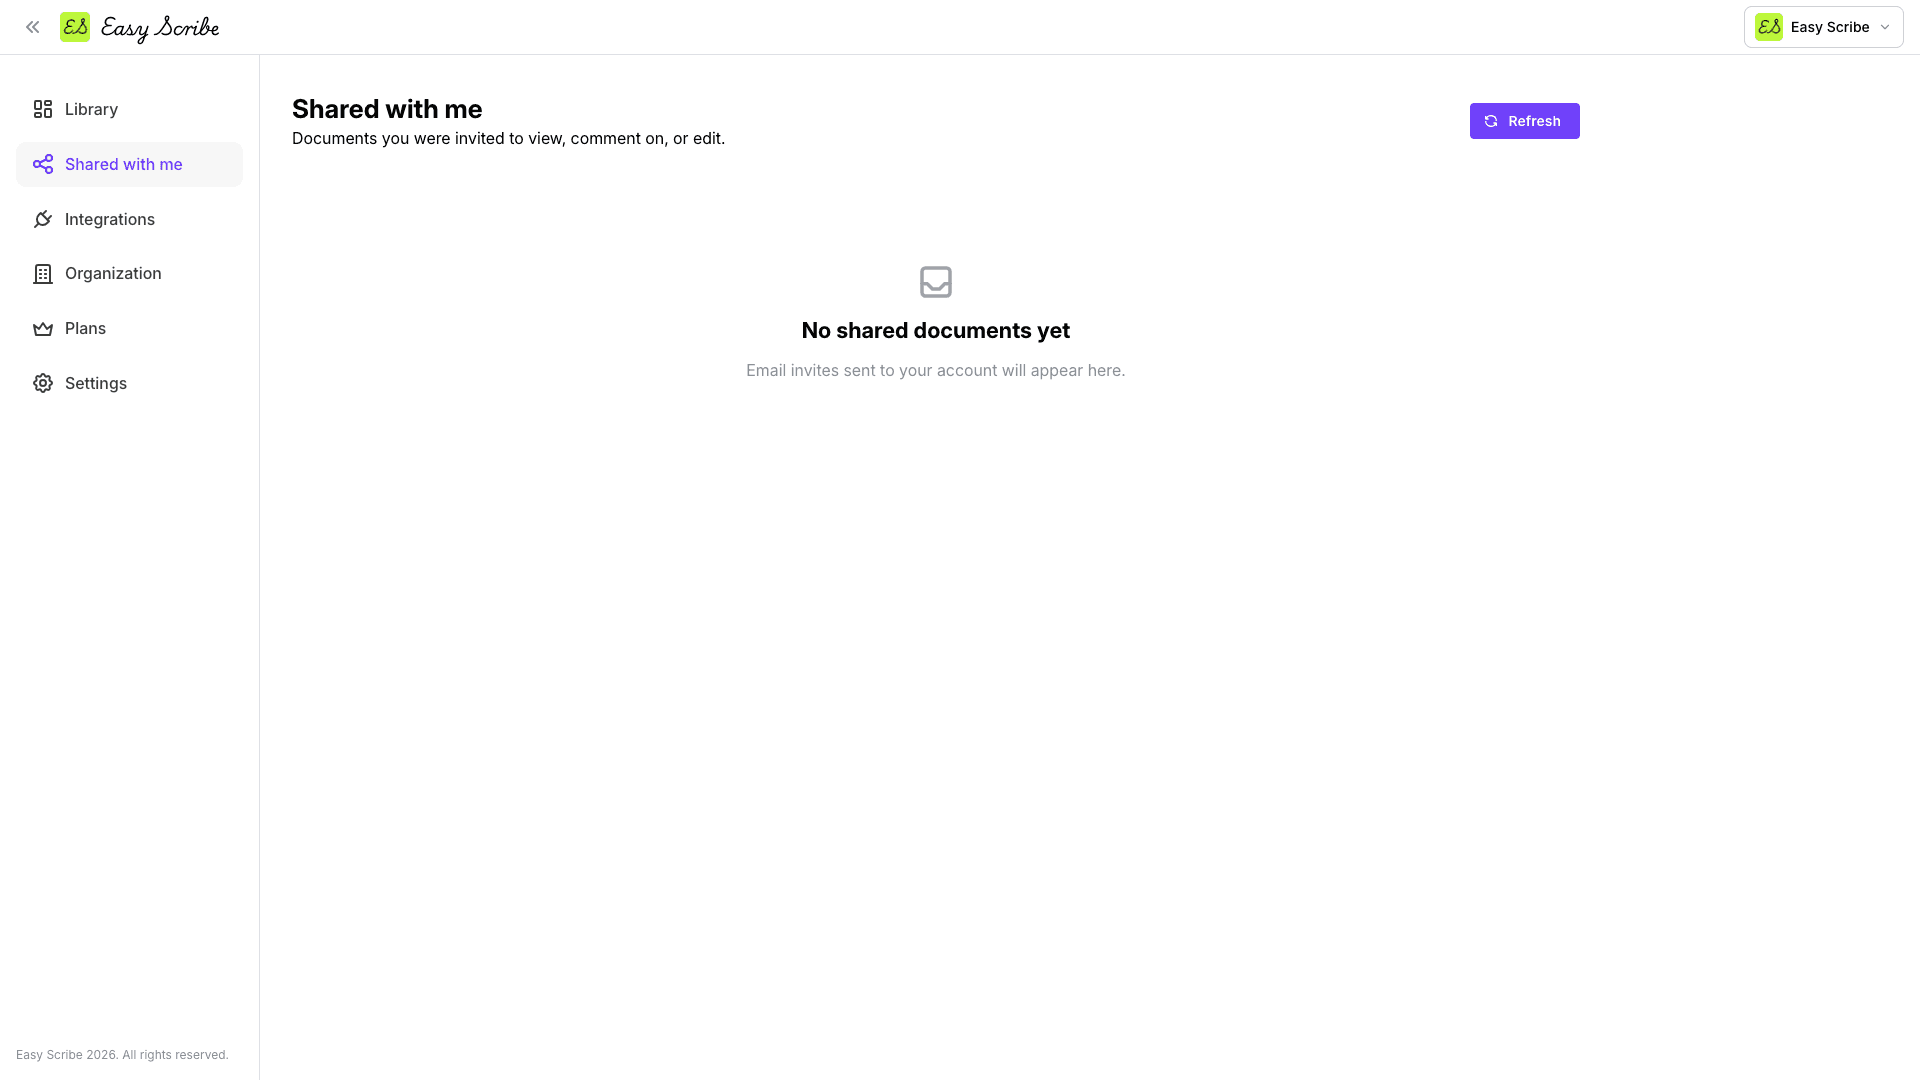
Shared with Me: A Single View for Incoming Shares
Documents that others share with you now appear in the Shared with me page, accessible from the sidebar. This gives you a dedicated space to find and open documents you have been invited to, separate from your own library.
Organization Settings and Team Management
Alongside sharing, we have introduced the Organization page. Here you can:
Edit your organization name and organization image.
View and manage team members with roles (owner, admin, member).
Send email invites to bring new members into the workspace.
Free workspaces support up to 2 members. Pro workspaces allow unlimited members.

Practical Tips
Sync often. After editing the source document, use the Sync control in the walkthrough editor so steps reflect the latest content.
Preview before sharing. Open preview mode on each edited step to confirm the guide highlights the correct UI element.
Set embed dimensions before copying. Adjust the width and height in the Embed tab so the walkthrough fits your destination page without extra resizing.
Use the Manage tab to control access. You can revoke or downgrade document access at any time without deleting the document.
Keep walkthroughs focused. Each walkthrough maps to a single document, so keep source documents task-focused for the clearest guided experience.
Frequently Asked Questions
Can I add new steps to a walkthrough after it is generated?
Yes. Open the walkthrough in the editor, use the Add step dialog to insert a Text slide or Image slide, then drag the new step to the correct position in the steps list.
What access levels are available when sharing a document?
Documents support View, Comment, and Edit access. You can set the level when copying a public link, sending an invite, or managing existing shares. Edit access is available for authenticated users and is not allowed on public links.
Are walkthrough shares view-only?
Yes. Walkthrough links and embeds are view-only. If collaborators need to comment on or edit the content, share the underlying document instead.
Is AI voice narration available on the Free plan?
AI voice narration for interactive walkthrough steps is a Pro feature. All other walkthrough creation and editing capabilities are available on Free.
How do I embed a walkthrough on my website?
Open the walkthrough, select Share, go to the Embed tab, set your preferred width and height, and copy the HTML embed code. Paste it into any HTML-supported page to display the walkthrough.
We are excited to announce a major set of features in Easy Scribe: interactive walkthroughs and sharing options. Together, these capabilities let you turn your step-by-step documentation into clickable, guided tour experiences and distribute them to anyone through public links, private invites, or HTML embeds.
Whether you are onboarding new users, training teammates, or publishing customer-facing guides, these features give you a complete author-to-audience workflow without leaving Easy Scribe.
Why Interactive Walkthroughs Matter
Static documentation is helpful, but guided, visual experiences drive deeper understanding. Industry research shows that products with interactive onboarding see 50% higher activation rates than those relying on passive tours, and walkthroughs can reduce support ticket volume by 20-30% by delivering contextual, on-screen guidance.
Easy Scribe's interactive walkthroughs bring this same principle to your documentation. From a single screen recording, you already get an AI-generated step-by-step document. Now you can convert that same document into a player-based, clickable tour your audience can follow at their own pace.
What Is an Interactive Walkthrough in Easy Scribe?
An interactive walkthrough is a player-based tour generated from an existing Easy Scribe document. Each step in the walkthrough can be one of three types:
Spotlight hotspot tour over a screenshot (click, focus, or tooltip hotspots)
Screenshot with a caption
Text slide
The walkthrough is fully editable after generation, and it stays connected to its source document so you can sync changes as content evolves.
How to Create and Edit an Interactive Walkthrough
Step 1: Generate the walkthrough
Open a completed document in the Easy Scribe editor, then select the Interactive Walkthrough tab. Easy Scribe generates the walkthrough from the document's existing steps. Review the title, subtitle, and step list to confirm the flow matches your intent.
For full details, see the Creating an Interactive Walkthrough guide.
Step 2: Edit individual steps
Select any step in the steps list to open it in the editor. From there you can:
Reposition the guide - Open the Step actions menu, select Place guide, and click where the highlight should point in the preview.
Sync from the source document - Hover over Sync to pull the latest content from the document into the walkthrough.
Add AI voice narration (Pro) - Hover over Add voice to generate narration for the step.
Preview - Open preview mode to review the updated step before sharing.
See the Editing a Walkthrough Step docs for a detailed walkthrough.
Step 3: Add, remove, and sort steps
You are not limited to the auto-generated steps. Use the Add step dialog to insert new content:
Text slide - Enter a title and slide content.
Image slide - Enter a title, caption, and choose an image source (such as a document screenshot).
After adding a step, drag it to the correct position in the steps list and confirm its placement. For the full procedure, see Adding and Sorting Walkthrough Steps.
Sharing Options: Get Your Work in Front of the Right People
Once your document or walkthrough is ready, Easy Scribe gives you multiple ways to share it. The sharing controls are accessed by selecting Share from the top-right toolbar of any document or walkthrough.
Share a document
The Share document dialog offers four tabs:
Link - Copy a public document link. Choose the access level: View, Comment, or Edit.
Embed - Preview the embedded document, set dimensions, and copy the HTML embed code to paste into any HTML-supported destination.
Invite - Add specific people, assign an access level (View, Comment, or Edit), and send the invitation directly.
Manage - View existing shares, change access levels (View only, Can comment, Can edit), Revoke access, or Delete permanently.
Share an interactive walkthrough
Walkthrough sharing is streamlined for distribution:
Link - Copy a public, view-only walkthrough URL. Anyone with the link can view the walkthrough.
Embed - Set the width and height, then copy the embed code to display the walkthrough on an external page.
Walkthrough links are view-only. If you need comment or edit access for collaborators, use document sharing instead.
For full details on all sharing flows, see the Sharing Options documentation.
Shared with Me: A Single View for Incoming Shares
Documents that others share with you now appear in the Shared with me page, accessible from the sidebar. This gives you a dedicated space to find and open documents you have been invited to, separate from your own library.
Organization Settings and Team Management
Alongside sharing, we have introduced the Organization page. Here you can:
Edit your organization name and organization image.
View and manage team members with roles (owner, admin, member).
Send email invites to bring new members into the workspace.
Free workspaces support up to 2 members. Pro workspaces allow unlimited members.
Practical Tips
Sync often. After editing the source document, use the Sync control in the walkthrough editor so steps reflect the latest content.
Preview before sharing. Open preview mode on each edited step to confirm the guide highlights the correct UI element.
Set embed dimensions before copying. Adjust the width and height in the Embed tab so the walkthrough fits your destination page without extra resizing.
Use the Manage tab to control access. You can revoke or downgrade document access at any time without deleting the document.
Keep walkthroughs focused. Each walkthrough maps to a single document, so keep source documents task-focused for the clearest guided experience.
Frequently Asked Questions
Can I add new steps to a walkthrough after it is generated?
Yes. Open the walkthrough in the editor, use the Add step dialog to insert a Text slide or Image slide, then drag the new step to the correct position in the steps list.
What access levels are available when sharing a document?
Documents support View, Comment, and Edit access. You can set the level when copying a public link, sending an invite, or managing existing shares. Edit access is available for authenticated users and is not allowed on public links.
Are walkthrough shares view-only?
Yes. Walkthrough links and embeds are view-only. If collaborators need to comment on or edit the content, share the underlying document instead.
Is AI voice narration available on the Free plan?
AI voice narration for interactive walkthrough steps is a Pro feature. All other walkthrough creation and editing capabilities are available on Free.
How do I embed a walkthrough on my website?
Open the walkthrough, select Share, go to the Embed tab, set your preferred width and height, and copy the HTML embed code. Paste it into any HTML-supported page to display the walkthrough.

Easy Scribe
Rich documentation, walkthroughs, and guides from screen recordings.
Quick links
RESOURCES
© 2025 Easy Scribe. All Rights Reserved