Article
Troubleshooting Guide Generator for QA Teams
Your QA team finds a bug. Someone records it, maybe in Loom, maybe a shaky phone video of their monitor. Then a second person watches the recording, pauses every few seconds, takes a screenshot, types out the steps, and formats the whole thing so a developer can actually reproduce the issue. If the bug is intermittent, they repeat this process multiple times. Half a morning, gone on a single repro.
This is a well-documented pain point in software teams. The cost of insufficient detail in bug reports is failed reproduction and wasted engineering time. And as one analysis of QA workflows found, the average developer response to a bug report required two additional pieces of information beyond what was provided, triggering 2.3 rounds of back-and-forth per bug on average.
Easy Scribe's Troubleshooting Guide template changes this. Record the bug once. The tool transcribes your narration, pulls screenshots from the recording, and generates an ordered, captioned troubleshooting guide with screenshots placed at the exact steps where they belong.
How It Works in Three Steps
Step 1: Record the Bug
Use the in-app screen recorder. Narrate what you are doing as you trigger the bug: "I'm clicking the export button, and the dropdown renders blank." The mic picks up your play-by-play.
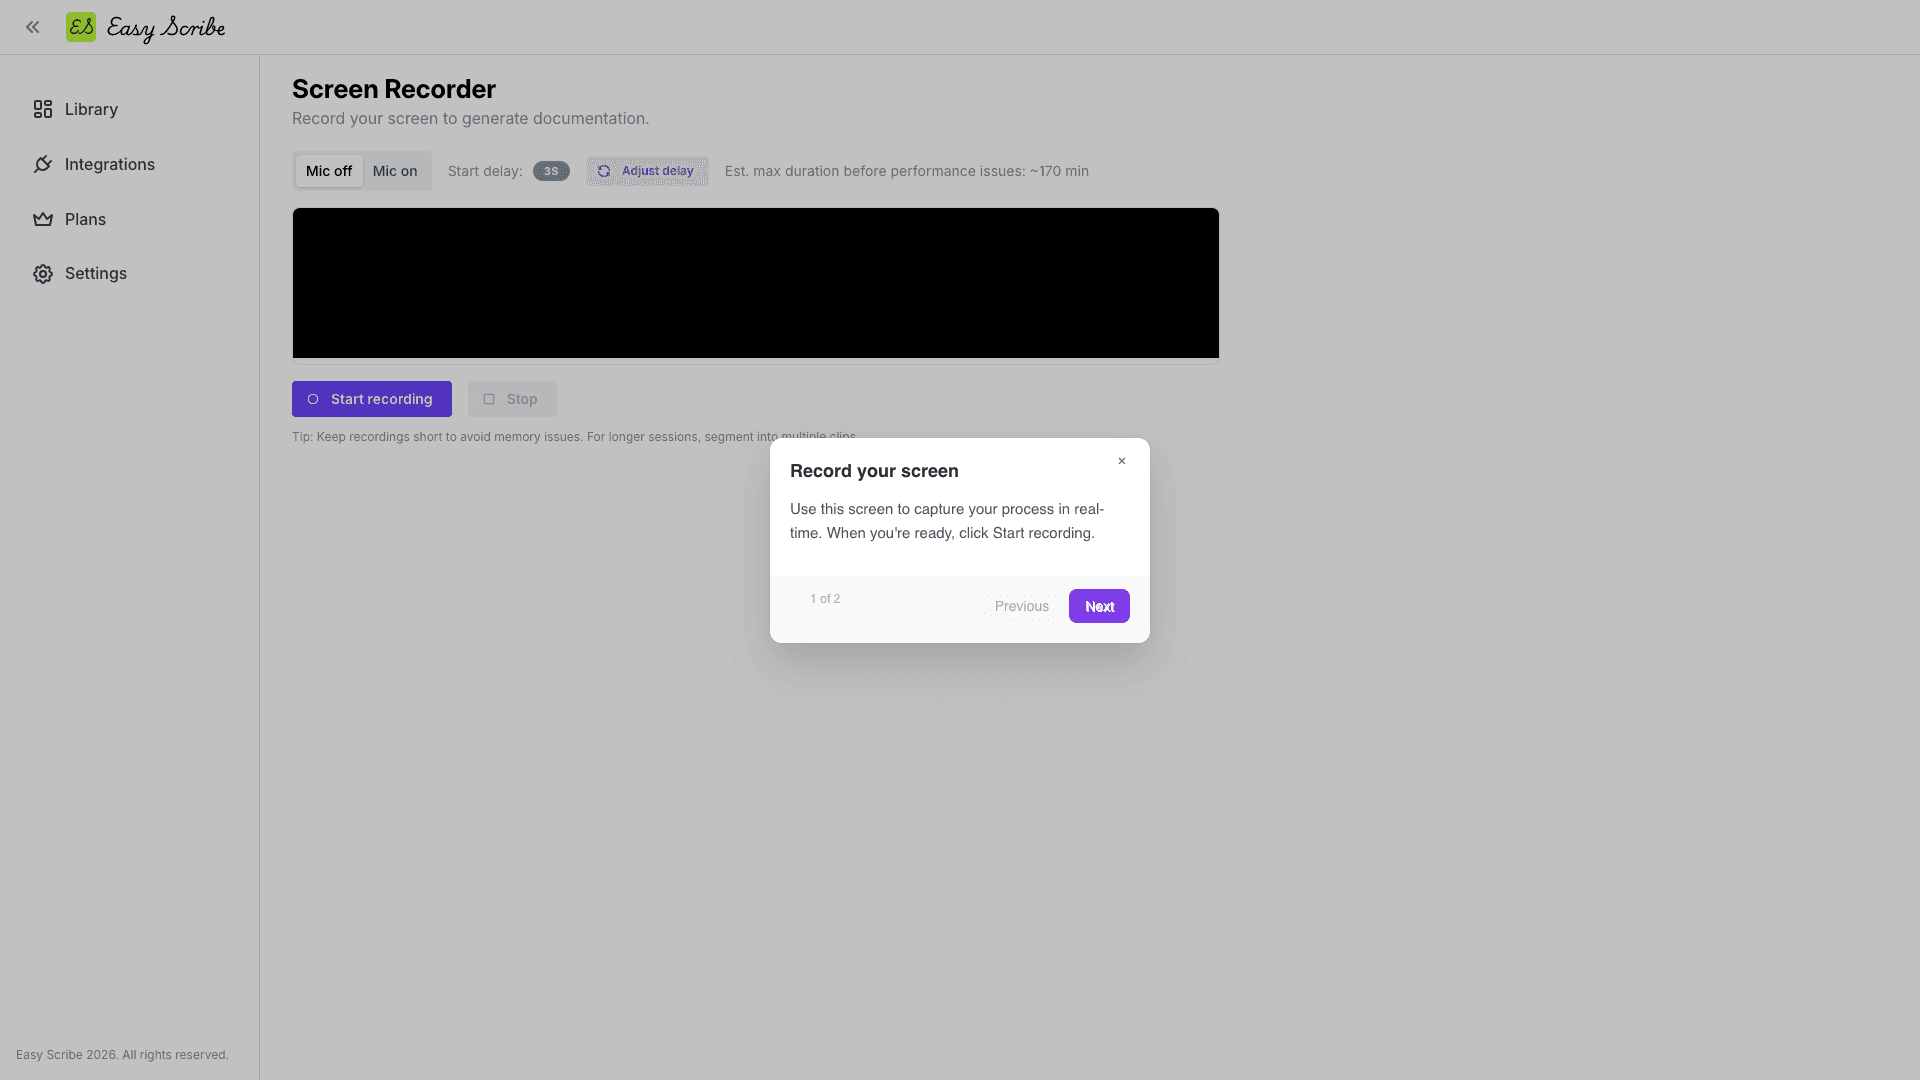
The recorder is browser-based. No extension, no install. Your browser handles everything. You can toggle the mic on or off. A configurable start delay (default 5 seconds) gives you time to set up the right window before capture begins.
If someone already recorded the bug on their phone or in another tool, upload that video instead. Easy Scribe accepts both desktop and mobile recordings, with no upload size limits.
Step 2: Pick the Troubleshooting Guide Template
On the New Document screen, enter a clear title, something like "Payment modal fails to load on Safari iOS." Open the Document Template dropdown and select Troubleshooting Guide.
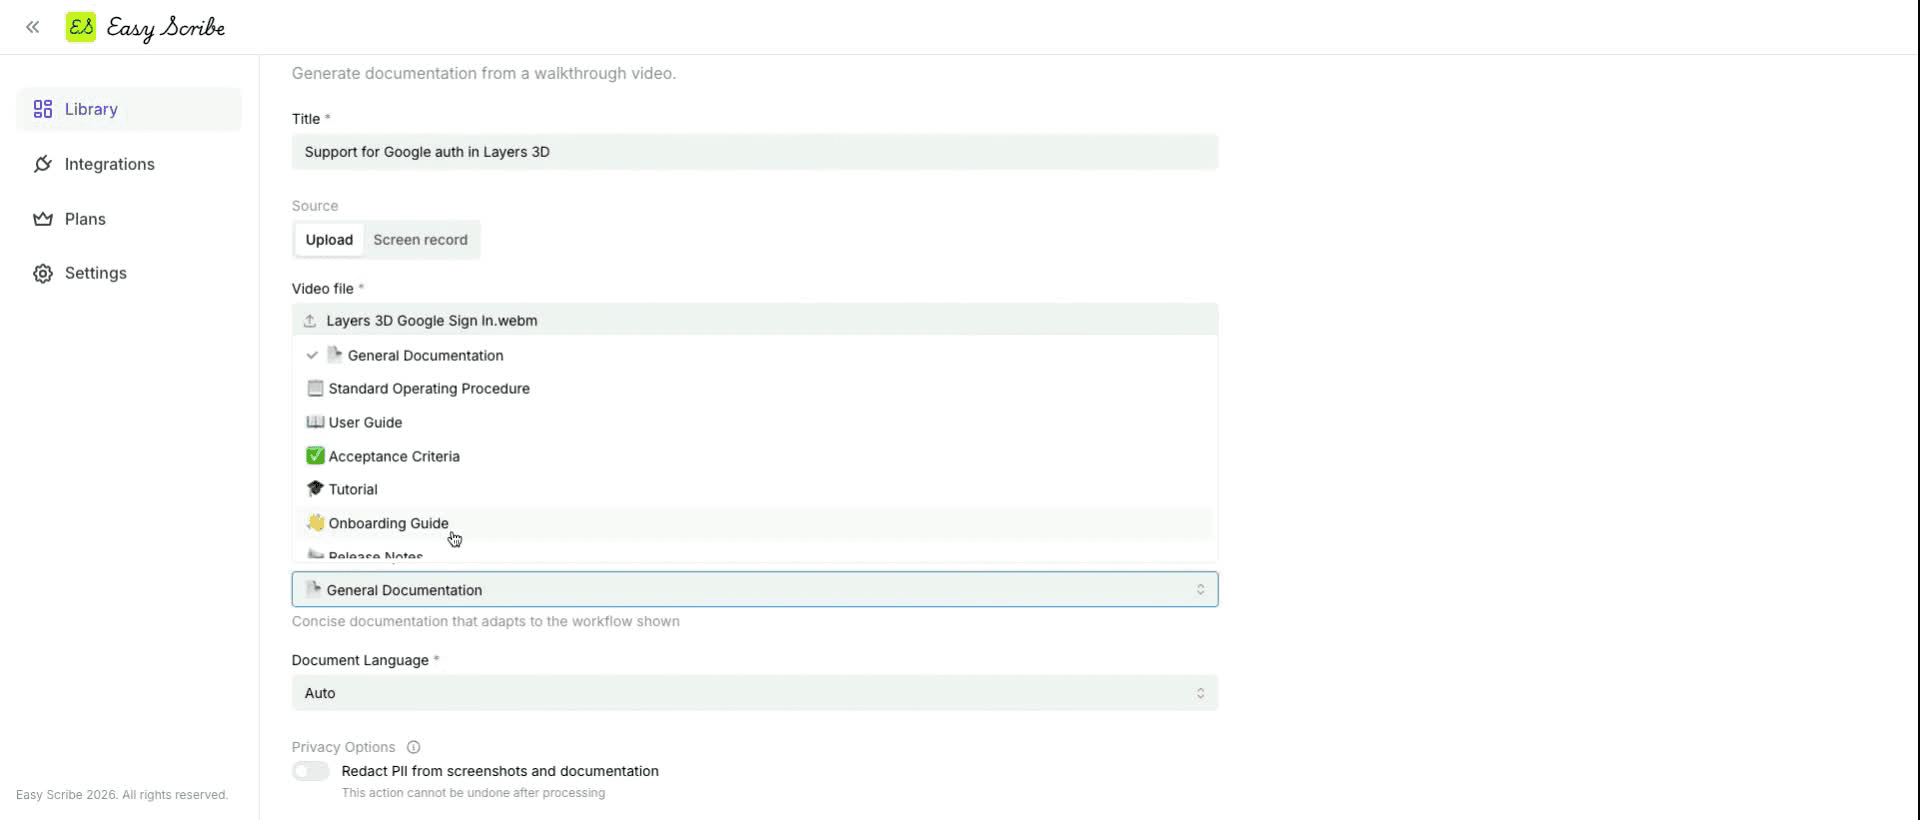
The template selector offers eight options: General Documentation, Standard Operating Procedure, User Guide, Tutorial, Onboarding Guide, Release Notes, Troubleshooting Guide, and Acceptance Criteria. For bug repros, Troubleshooting Guide is the one you want, as it structures the output for issue diagnosis and resolution.
You can also add optional description or instructions to guide the generation, for example: "Focus on the Safari-specific rendering issue. Audience is the front-end team."
Hit Create.
Step 3: Review and Share
The generated guide opens in the rich text editor. It includes:
An Overview section describing the issue and context
Numbered reproduction steps with screenshots captured at each step
Expected vs. actual behavior sections
Environment notes (browser, OS, version, whatever you narrated)
The screenshots are woven into the steps, not appended at the bottom. Step 3's screenshot sits next to Step 3. This is the thing that saves the most time: no dragging images around after the fact.
The editor autosaves your changes. You can adjust headings (H1 through H4), add bold or italic emphasis, reorder lists, and drag-and-drop images to reposition them. When the guide looks right, export it to PDF, Markdown, Word (DOCX), or HTML. On the Pro plan, you can also export directly to Confluence.
Or simply share a link from Easy Scribe and send it to the dev channel.
Why Screenshots at the Right Step Matters
A good troubleshooting guide pairs each instruction with a visual. Tools like screenshots, diagrams, or even flowcharts can enhance the user-friendliness of a troubleshooting guide by illustrating how the user will progress to the next steps. But manually placing screenshots after the fact is tedious. You end up with a pile of images at the end of a document and spend time matching each one to the right step.
Easy Scribe handles this automatically. Screenshots are extracted from your recording and tied to the relevant step during generation. If you need more control, the built-in video editor lets you trim clips and add manual screenshot points at key transitions before generating the document. These manual points are included in addition to the auto-captured ones.
Fine-Tuning Your Output
A few tips for getting the best results from the Troubleshooting Guide template:
Narrate clearly. The audio transcription feeds the generated instructions. Describe each action as you do it: what you clicked, what you expected, what happened instead.
Keep recordings focused. One bug per recording. If you are documenting multiple issues, split them into separate clips. The recorder has an estimated max of around 85 minutes before performance issues, but shorter recordings produce cleaner guides.
Use manual screenshot points. For complex bugs, open the video editor and add screenshot points at critical frames, like the exact moment an error dialog appears. Move the playhead to the frame, click Add Screenshot Point, and repeat as needed.
Add generation instructions. Use the optional Description/Instructions field to steer structure and focus: specify the audience, flag which steps to emphasize, or note the environment details if you forgot to narrate them.
Try It Free
The Free tier includes everything described above: the in-app recorder, AI-generated step-by-step guides, auto-extracted screenshots, audio transcription, the rich text editor with autosave, and export to PDF, Markdown, and HTML. No credit card, no watermark. You get a team workspace for up to 2 users and unlimited documents.
Record a bug repro, generate the guide, and see if the output is useful enough to keep. If it is not, you spent five minutes finding out.
Frequently Asked Questions
What does a generated Troubleshooting Guide include?
The output is a structured document with an overview of the issue, numbered reproduction steps with contextual screenshots placed at each step, expected vs. actual behavior sections, and environment notes based on what you narrated. Everything opens in the editor for refinement.
Can I use a video I already recorded somewhere else?
Yes. Easy Scribe accepts uploaded video files from desktop or mobile devices, with no upload size limits. You do not need to use the in-app recorder. Upload the file, pick the Troubleshooting Guide template, and generate.
What export formats are available?
The Free plan supports export to PDF, Markdown, and HTML. The Pro plan adds Word (DOCX) export and native Confluence export, where you can create or update Confluence pages directly from Easy Scribe.
Do I need to install a browser extension?
No. Easy Scribe is entirely browser-based. The screen recorder, editor, and export tools all run in your browser without any extension or installation. You can optionally install it as a PWA from the dashboard if you prefer an app-like experience.
How is this different from just attaching a video to a bug ticket?
A video requires someone to watch it in real time. A generated troubleshooting guide gives developers scannable, numbered steps with screenshots they can follow at their own pace. Poorly written reports waste time and create unnecessary back-and-forth between QA teams and developers. A structured guide with visuals at each step reduces that friction significantly.
Your QA team finds a bug. Someone records it, maybe in Loom, maybe a shaky phone video of their monitor. Then a second person watches the recording, pauses every few seconds, takes a screenshot, types out the steps, and formats the whole thing so a developer can actually reproduce the issue. If the bug is intermittent, they repeat this process multiple times. Half a morning, gone on a single repro.
This is a well-documented pain point in software teams. The cost of insufficient detail in bug reports is failed reproduction and wasted engineering time. And as one analysis of QA workflows found, the average developer response to a bug report required two additional pieces of information beyond what was provided, triggering 2.3 rounds of back-and-forth per bug on average.
Easy Scribe's Troubleshooting Guide template changes this. Record the bug once. The tool transcribes your narration, pulls screenshots from the recording, and generates an ordered, captioned troubleshooting guide with screenshots placed at the exact steps where they belong.
How It Works in Three Steps
Step 1: Record the Bug
Use the in-app screen recorder. Narrate what you are doing as you trigger the bug: "I'm clicking the export button, and the dropdown renders blank." The mic picks up your play-by-play.
The recorder is browser-based. No extension, no install. Your browser handles everything. You can toggle the mic on or off. A configurable start delay (default 5 seconds) gives you time to set up the right window before capture begins.
If someone already recorded the bug on their phone or in another tool, upload that video instead. Easy Scribe accepts both desktop and mobile recordings, with no upload size limits.
Step 2: Pick the Troubleshooting Guide Template
On the New Document screen, enter a clear title, something like "Payment modal fails to load on Safari iOS." Open the Document Template dropdown and select Troubleshooting Guide.
The template selector offers eight options: General Documentation, Standard Operating Procedure, User Guide, Tutorial, Onboarding Guide, Release Notes, Troubleshooting Guide, and Acceptance Criteria. For bug repros, Troubleshooting Guide is the one you want, as it structures the output for issue diagnosis and resolution.
You can also add optional description or instructions to guide the generation, for example: "Focus on the Safari-specific rendering issue. Audience is the front-end team."
Hit Create.
Step 3: Review and Share
The generated guide opens in the rich text editor. It includes:
An Overview section describing the issue and context
Numbered reproduction steps with screenshots captured at each step
Expected vs. actual behavior sections
Environment notes (browser, OS, version, whatever you narrated)
The screenshots are woven into the steps, not appended at the bottom. Step 3's screenshot sits next to Step 3. This is the thing that saves the most time: no dragging images around after the fact.
The editor autosaves your changes. You can adjust headings (H1 through H4), add bold or italic emphasis, reorder lists, and drag-and-drop images to reposition them. When the guide looks right, export it to PDF, Markdown, Word (DOCX), or HTML. On the Pro plan, you can also export directly to Confluence.
Or simply share a link from Easy Scribe and send it to the dev channel.
Why Screenshots at the Right Step Matters
A good troubleshooting guide pairs each instruction with a visual. Tools like screenshots, diagrams, or even flowcharts can enhance the user-friendliness of a troubleshooting guide by illustrating how the user will progress to the next steps. But manually placing screenshots after the fact is tedious. You end up with a pile of images at the end of a document and spend time matching each one to the right step.
Easy Scribe handles this automatically. Screenshots are extracted from your recording and tied to the relevant step during generation. If you need more control, the built-in video editor lets you trim clips and add manual screenshot points at key transitions before generating the document. These manual points are included in addition to the auto-captured ones.
Fine-Tuning Your Output
A few tips for getting the best results from the Troubleshooting Guide template:
Narrate clearly. The audio transcription feeds the generated instructions. Describe each action as you do it: what you clicked, what you expected, what happened instead.
Keep recordings focused. One bug per recording. If you are documenting multiple issues, split them into separate clips. The recorder has an estimated max of around 85 minutes before performance issues, but shorter recordings produce cleaner guides.
Use manual screenshot points. For complex bugs, open the video editor and add screenshot points at critical frames, like the exact moment an error dialog appears. Move the playhead to the frame, click Add Screenshot Point, and repeat as needed.
Add generation instructions. Use the optional Description/Instructions field to steer structure and focus: specify the audience, flag which steps to emphasize, or note the environment details if you forgot to narrate them.
Try It Free
The Free tier includes everything described above: the in-app recorder, AI-generated step-by-step guides, auto-extracted screenshots, audio transcription, the rich text editor with autosave, and export to PDF, Markdown, and HTML. No credit card, no watermark. You get a team workspace for up to 2 users and unlimited documents.
Record a bug repro, generate the guide, and see if the output is useful enough to keep. If it is not, you spent five minutes finding out.
Frequently Asked Questions
What does a generated Troubleshooting Guide include?
The output is a structured document with an overview of the issue, numbered reproduction steps with contextual screenshots placed at each step, expected vs. actual behavior sections, and environment notes based on what you narrated. Everything opens in the editor for refinement.
Can I use a video I already recorded somewhere else?
Yes. Easy Scribe accepts uploaded video files from desktop or mobile devices, with no upload size limits. You do not need to use the in-app recorder. Upload the file, pick the Troubleshooting Guide template, and generate.
What export formats are available?
The Free plan supports export to PDF, Markdown, and HTML. The Pro plan adds Word (DOCX) export and native Confluence export, where you can create or update Confluence pages directly from Easy Scribe.
Do I need to install a browser extension?
No. Easy Scribe is entirely browser-based. The screen recorder, editor, and export tools all run in your browser without any extension or installation. You can optionally install it as a PWA from the dashboard if you prefer an app-like experience.
How is this different from just attaching a video to a bug ticket?
A video requires someone to watch it in real time. A generated troubleshooting guide gives developers scannable, numbered steps with screenshots they can follow at their own pace. Poorly written reports waste time and create unnecessary back-and-forth between QA teams and developers. A structured guide with visuals at each step reduces that friction significantly.

Easy Scribe
Rich documentation, walkthroughs, and guides from screen recordings.
Quick links
RESOURCES
© 2025 Easy Scribe. All Rights Reserved